Skip to content

3

Microworms - which are actually nematodes, not worms - are a convenient live food because cultures can be maintained almost indefinitely with very little maintenance.

Microworms - which are actually nematodes, not worms - are a convenient live food because cultures can be maintained almost indefinitely with very little maintenance.  Unlike live brine shrimp, microworms don't have to be hatched and then immediately fed to your fish. An individual culture will last 4-6 weeks, with live worms being harvested and fed every day.

Microworms are a good food for fry that are too small to consume baby brine shrimp or dry foods. In my fish room I feed them to Melanotaenia Praecox (dwarf neon rainbowfish) fry because their mouths are not big enough to eat baby brine shrimp for their first 1-2 weeks. 

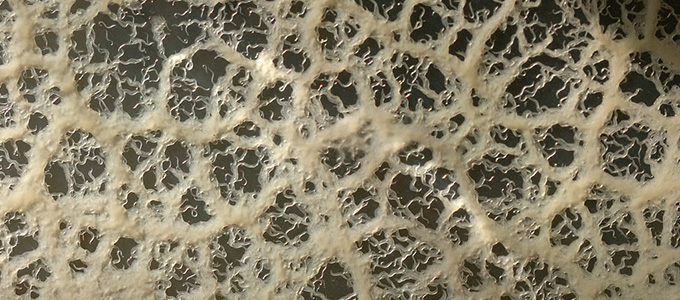
I shot the video below using a small microscope to show microworms moving in water. The larger hash marks are 1 mm apart, the largest microworms are about 1 mm in length, however they are only about 0.1 mm wide. This allows very small fish to slurp them up like noodles. You can also see much smaller worms that are only 0.2 - 0.3 mm long. The round objects are pieces of potato flake from the culture.

microworms under a microscope

How to Start a Microworm Culture

The first step to starting your own mircoworm farm is to obtain a starter culture. These can be found for sale on eBay, Amazon.com, or through local fish shops and aquarium clubs. A starter culture will be relatively inexpensive (usually around $10 for a good culture) and the best part is you will only have to pay this one time. Some people out there are selling cultures for as low as $3-$4*, but I strongly recommend paying slightly more for a culture that comes with worms, yeast, a container, and some instructions to get you started.

*I tried buying a culture for less than $4, and when it arrived it was a tiny bag in a standard letter envelope containing about a teaspoon of worms that smelled like death. It was a waste of money & time.

Once you have a starter culture and you begin setting up your own cultures, you should be able to keep live microworms available for your fish for as long as you want. The video below by Aquarium Co-op has a lot of good information on how and why you should set up a microworm culture.

Selecting a Container for your Microworm Culture

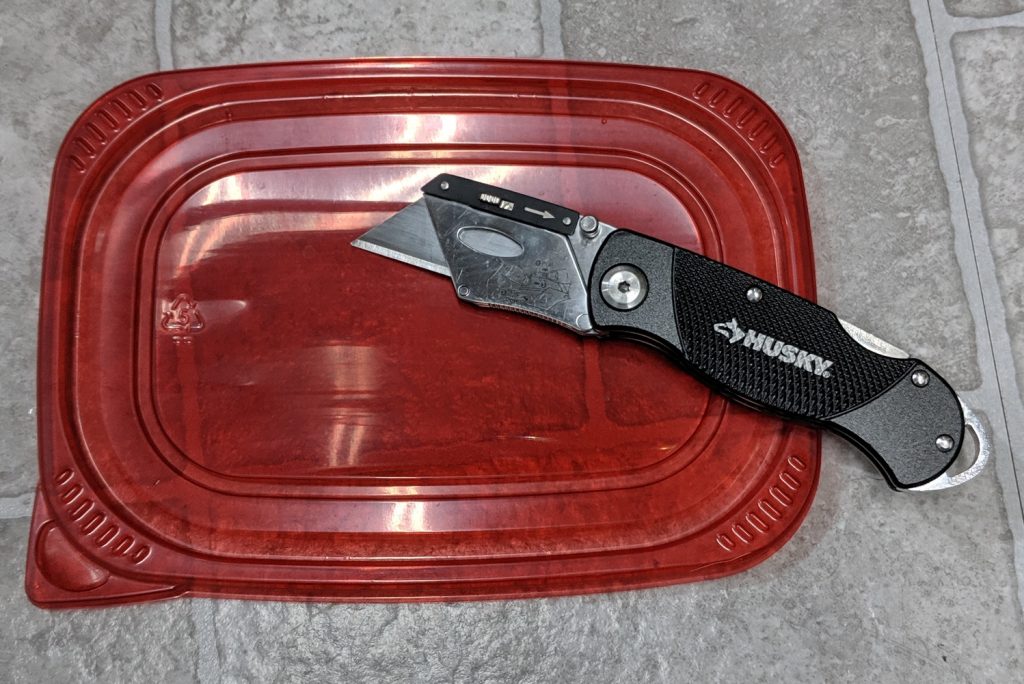
You can use just about any plastic container for a microworm culture, as long as it has a lid and a flat bottom to spread the culture media on. I like to use plastic containers from salad mix or packaged lunch meat that have been washed out.

Microworm Cultures
Microworm Cultures

Nematodes need oxygen to live. I use a utility knife to cut small air holes in the lid of the container. These holes don't need to be very big, just enough to allow some air to reach the culture. 

Utility Knife
Utility Knife

Selecting a Medium for your Microworm Culture

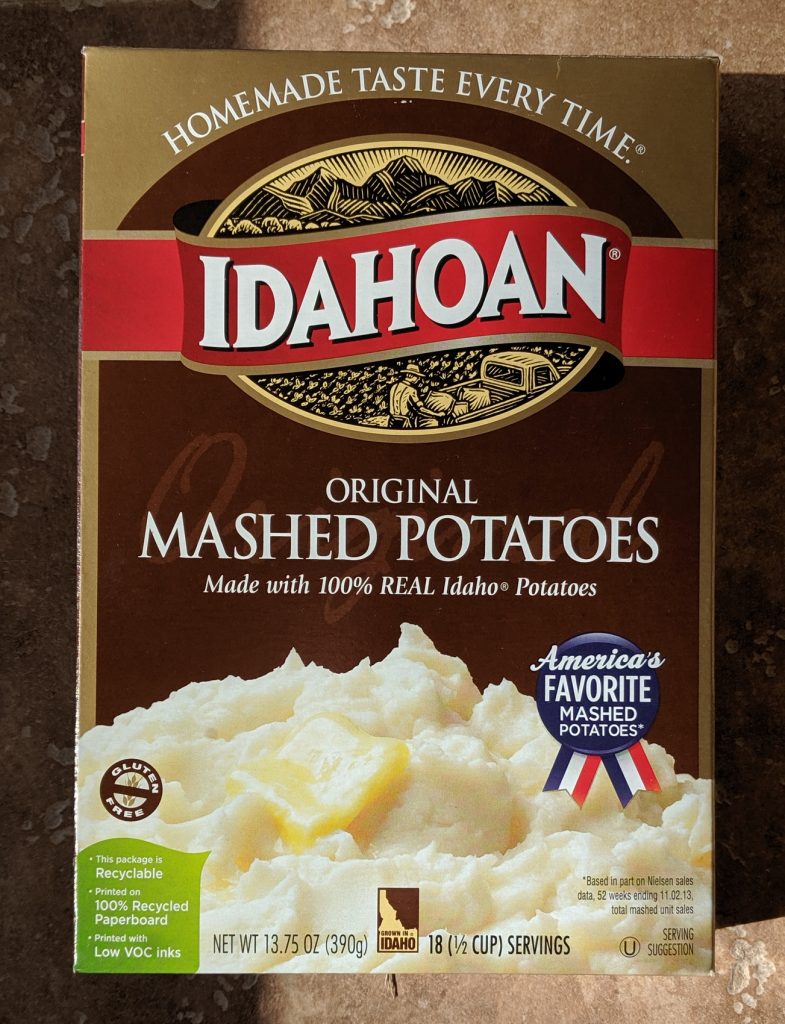
I use an instant potato mix as the base for my microworm cultures, as recommended by Aquarium Co-op. Other options include oatmeal, cornmeal, and baby cereal. Any of these soft grain mixes will work, but I've found the potato mix to be very cheap and easy to use. Just make sure whatever you buy has no additives.

Potato Mix
Potato Mix

Starting a Microworm Culture

Once you have starter worms, a container, potatoes, and some bakers yeast, you can mix up a new culture.

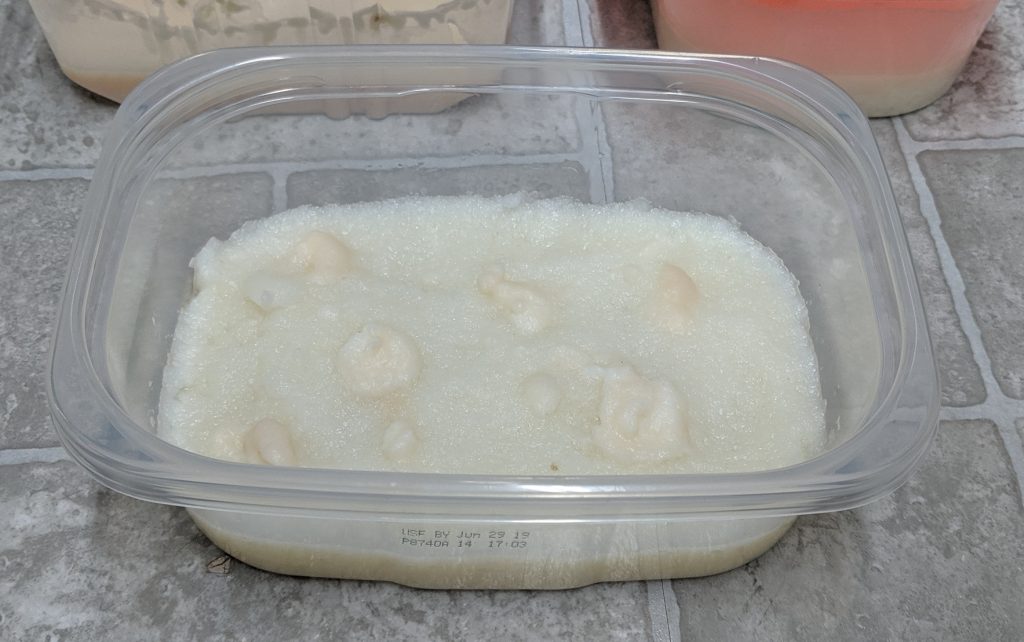
  1. Pour enough mashed potato mix into the container to cover the bottom with about a half inch layer. This will expand when water is added.
  2. Add water from an aquarium and stir until the mixture is similar to mashed potatoes. You don't want it too runny or too dry, it should look like the photo on the box.
  3. Smooth out the mixture in the container
  4. Add a little bit of baker's yeast, and gently stir it into the top layer of the mix
  5. Smooth out the mixture and add two spoonfuls of aquarium water to wet the top
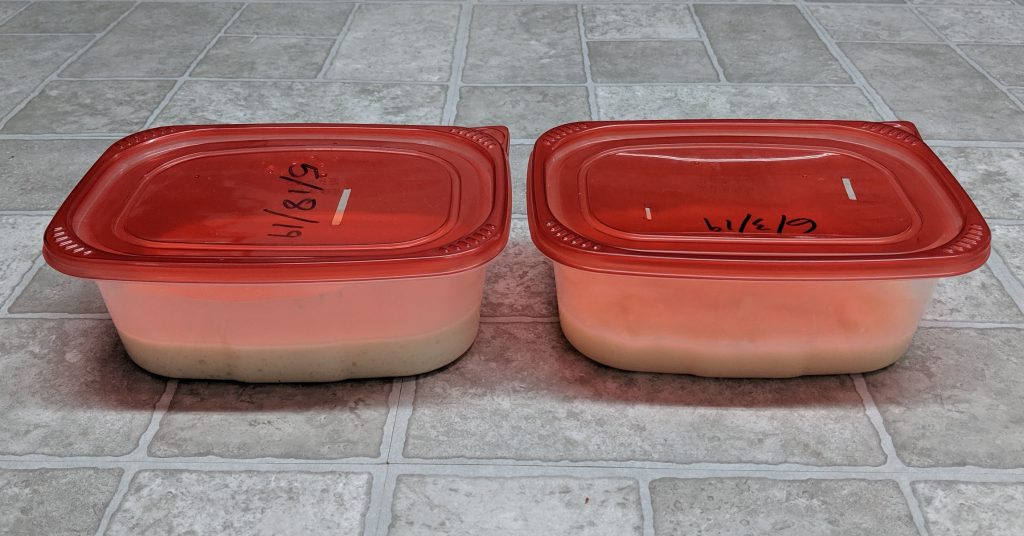
  6. Add the worms from your starter culture to the top of the mix, put the lid on the container (make sure you date it!) and wait a few days (3-5 days on average)
  7. Once you can see the top of the mixture shimmering or wiggling, you know the worms are multiplying. They can now be harvested using your finger or a spoon, paintbrush, etc. Just dunk them into the aquarium!
New Microworm Culture

Keeping Your Microworms Going

To make sure you never run out of microworms, its a good idea to always have 2 active cultures. I start a new culture every 3-4 weeks. Make sure you write the date you started the culture on the container!

Your existing cultures should be stirred gently about once a week to keep them thriving. They will have a vinegar-like smell to them, which is normal. If you can see live worms and don't see any mold, it is probably still good. Eventually the culture will start to stink badly or grow mold, and it should be discarded. This will happen after several weeks.


2

Outdoor Guppy Tub
Outdoor Guppy Tub

Outdoor Fish "Tubbing"

Keeping fish in small, temporary outdoor ponds or tubs is often referred to as "tubbing" among fishkeepers. The most popular fish to keep in tubs are probably live-bearers. This includes guppies, Endlers, mollies, platys, and many other species. These tubs are unfiltered and in many cases go an entire season without a water change. This summer I'm keeping guppies in a 100 gallon container in my back yard.

What Temperatures Can Guppies Survive Outside?

Unlike goldfish and koi, guppies can't survive outdoors in cold weather. While most sources will list the minimum acceptable temperature for guppies anywhere from 65°F - 72°F, they can tolerate water as cold as 60°F for short periods of time.

Where I live in Colorado, there is only about a 3 month window every year when temperatures are consistently warm enough for a guppy tub. The chart below shows daily average high and low temperatures specific to my area.

Colorado Average Monthly Temp

Water doesn't heat or cool as quickly as the surrounding air. This means the water in an outdoor tub usually won't reach the daily high or low temperature on a given day, it will drift gradually between them. The average water temperature should be near the center of the daily range. There will also be a temperature gradient between the water's surface and the bottom of the tub, assuming it is sufficiently large.

Actual Guppy Tub Temperature Observations

During the month of June I took temperature readings of my guppy tub at least once every day, up to 3 observations per day, for a total of 55 observations. The data I collected is shown in the chart below. You can see that on very hot days the water temperature (measured using a floating thermometer at the surface) reached as high as 86 degrees. This only lasted a few hours until the sun set, but I am planning on setting up some afternoon shade for the tub going into the hottest part of the year. As you might expect from historical weather data, the average water temp observed in June was 71.5°F.

Note: All of these temperature observations were made at various times throughout the day between 7:00 AM and 7:30 PM.  The highest temperatures were observed in the late afternoon after several hours of direct sun.

Water Temperature of the Guppy Tub Throughout June 2019

High 86
Low 58
Average 71.5

I kept the guppies in an unheated aquarium indoors at 68°F - 70°F for several months in preparation for this project, during which time they continued to breed and grow. I did not observe any deaths during the month shown here, and saw new fry after about 3 weeks of the guppies being in the tub. Based on my observations, guppies are able to tolerate relatively large daily swings in temperature, as long as the extremes are not too hot (above 90ºF) or too cold (below 60ºF).

Outdoor Guppy Tub Container

I chose a 100 gallon Rubbermaid stock tank for this guppy tub project.

100 Gallon Rubbermaid Stock Tank

I've seen others use rain barrels, kiddie pools, pond liners, etc. I wouldn't use anything that holds less than 40-50 gallons, because water parameters are going to be more stable in a larger volume of water. You should also avoid any container that is too tall and skinny, as this will make viewing and catching the fish difficult. Stock tanks (horse troughs) are the ideal shape for a garden pond.

Guppy Tub on Day 1
Guppy Tub on Day 1

Outdoor Guppy Tub Plants

Floating Plants
Floating Plants

Plants are an essential requirement for outdoor fish tubbing. Since you won't be performing many water changes, plants will help to remove excess nitrogen. They also compete with algae for nutrients. A pond without any plants will quickly turn green after a few days of sunlight. Any aquatic or marginal plant could be used in an outdoor guppy tub project. Some common pond plants include water lilies and water lettuce.

Shop Pond Plants on Amazon

I set up this pond with some duckweed & water lettuce from my Endler breeding aquarium.  I also added a large portion of najas/guppy grass. Guppy grass can be grown either rooted or as a floater, and is often used in breeding live-bearers. Floating plants are a good choice for an outdoor tub because the roots provide shade and cover for the fish, and they don't require any substrate.

Adding Fish to an Outdoor Tub

Ideally you'd want to have an outdoor tub filled and planted for several days before introducing fish. This gives the water an opportunity to age in the sun, as algae grows and infusoria begin to develop. I added water from established aquariums to my 100 gallon stock tank, and let it sit for 3 days before adding any fish. As mentioned above, I also prepared my guppies by keeping them in an unheated aquarium all spring before they moved into the tub.

Guppies
Guppies

Maintaining Water Quality in an Outdoor Tub

Water Changes

In a perfect world, all water that evaporated out of a tub would be replaced by rainwater, and all wastes would be absorbed by the plants. Of course that's not the world we live in. You should check the nitrates in an outdoor tub just like you would with an aquarium, and do a water change if they rise over 20 ppm. I've found that a 30% water change every 2 weeks is adequate in my pond. This probably wouldn't be necessary if I had enough plants to entirely cover the surface.

Aeration

I use a solar powered air pump to oxygenate the water. More on that in this post, but you can get the solar panel I'm using here on Amazon. You'll also need an air pump that can run off USB power, which I got from Aquarium Coop (https://www.aquariumcoop.com/). You can also buy them on Amazon. This pump runs about 10-11 hours per day (you know, solar) and does a good job keeping the water from getting stagnant.

14

This store-bought shelving unit is the perfect size for supporting a pair of 40 gallon breeder aquariums.
40 Breeder Rack
40 Breeder Rack

I've built a few DIY aquarium racks, but I wanted to go with a steel frame for my two 40 breeders to save space. Unlike a wooden frame, these steel supports lay flat against the sides of the aquariums. Steel shelving can also support a lot of weight - 800 lbs per shelf in this case. Water weighs roughly 8 lbs per gallon, so 40 gallons of water alone is 320 lbs. When you add the weight of the glass aquarium (58 lbs for a 40 breeder), substrate, heater, filters, etc. the total weight of one 40 gallon aquarium can be over 400 lbs.

Where to Get a Steel Aquarium Rack

Edsal Storage Unit
Edsal Storage Unit

These heavy duty storage units have been recommended by several people over the past few years as an affordable store-bought option for holding one or two 40 gallon tanks. This video by Aquarium Co-op from 2014 referenced a very similar rack that may or may not still be available from Lowe's. I purchased mine at Home Depot. Similar units are available from a variety of retailers, including this Muscle Rack on amazon. Fortunately 36" x 18" seems to be a fairly common shelving size, so it should not be too difficult for most people to find.

Aquarium Rack Assembly

The cool thing about these 5-shelf steel units is that they are really two units that stack. The kit comes with eight upright posts that are 3 feet long, which makes the unit 6 feet tall when stacked. If you didn't want one tank on top of the other, you could place both sets of uprights on the floor and have two separate aquarium stands.

First Aquarium in Place

For my application I only used 3 of the 5 shelves that came with the unit. It has to be assembled from the floor up, so the bottom shelf goes on first, followed by the first aquarium shelf. Because the dimensions are so similar to those of a 40 breeder aquarium, the tank has to be lowered into the posts from the top. This gets tricky when you get to the top aquarium.

Hacksaw
Hacksaw

In order to be able to lift the top aquarium above the tops of the posts, I cut about 6 inches off the front two uprights using a hacksaw. Cutting through the steel was actually easier than it looks because its not very thick. Once the cuts were made, I was able to lift the top tank up (with help) and slide it down into place.

40 breeder rack
40 breeder rack

Although two of the shelves were not used on this rack, I added their steel support sections to the sides and back of the unit to add stability. Without the extra bracing, the whole rack was somewhat wobbly. In the photo above you can see two extra 36" braces positioned a few inches below each aquarium. This keeps the rack from bowing or shifting under the weight of two full aquariums.

After both tanks were on the shelves I moved the unit into its place along the wall and finished the overflow plumbing before filling with water. I also painted the bottom shelf black to match the rest of the rack. The space underneath the tanks adds a lot of extra storage to the fish room. I keep my folding step ladder tucked next to the rack so that it's easy to access when I need to work on the top tank.

Bottom Shelf Storage