Skip to content

19

20 long with DIY glass lid

I have DIY glass aquariums lids on three of my planted tanks. They're cheaper to make than almost any lid you can buy commercially and, unlike lids with hinges, they allow a ton of light into the tank.

Each one of these lids cost less than $20 and required no tools to make

Pros & Cons to a DIY Glass Aquarium Lid

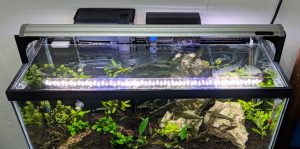
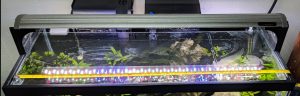
Above you can see a glass lid on my 20 gallon long planted tank. There are a lot of benefits to a solid glass lid like this:

  • It wont become cloudy or discolored over time like plastic lids
  • It wont bend or sag like plastic lids
  • It keeps moisture in the aquarium, and blocks almost no light
  • It is made custom for your application, so you can choose its dimensions

There are only a couple of reasons NOT to use a solid glass lid:

  • This design only works on aquariums with a rim on the top
  • They are breakable, and can cause injury to you or your fish if broken (I have broken one)

In my opinion the benefits definitely outweigh the risks. I have used these lids for years on different aquariums and only ever broken one. No glass actually got into my aquarium, I was moving the lid and not paying enough attention. If you're always careful when handling them, there's not much to worry about.

How to Make a DIY Glass Aquarium Lid

Making one of these lids is very simple. All you need to do is:

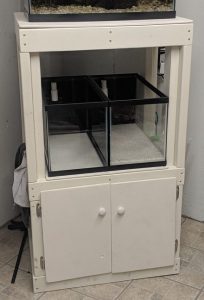
1. Measure your aquarium

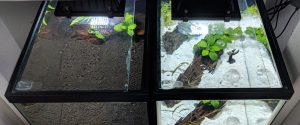
You want the lid to rest on the ledge inside the plastic rim of the tank, so you'll measure from one inside edge to the other. Then, you have to decide how far across the aquarium you want the lid to extend.

measure top of aquarium

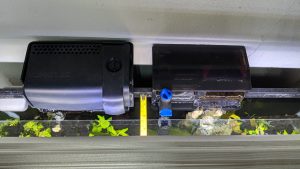
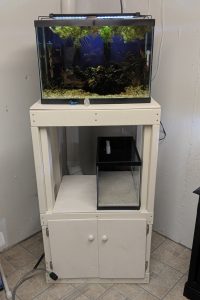
In the photo above you can see my HOB filters extend about 2 inches into the aquarium. I had my lid cut to leave a little more than 2 inches of open space in the back, so that the filters don't contact or spray water onto the glass. This space on the back side is also handy for dropping food into the tank without moving the lid.

2. Have a piece of glass cut to your dimensions

I have always gone to a local hardware store to have pieces of glass cut, but you can also go to a specialty glass shop. I use Ace Hardware in the Denver area, but I have also heard that some Lowes locations will cut glass. You should be able to find a place that will cut glass in your area.

Since this is just a single pane of glass, it should be less than $20, even for a long cut like my 29" lid below. I paid about $10 for that piece of glass that is roughly 29" x 9".

this lid is 29" long

3. Attach hooks for lifting and moving the lid

I use clear command mini hooks as handles for these lids. A pack of these hooks is enough for 4-5 DIY aquarium lids, and only adds a couple dollars to the cost of each one.

clear hooks
clear hooks

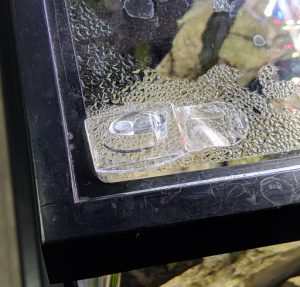
I like these because they blend in with the glass lid, and they stick on extremely well. Once they are attached, you can lift the lid off just using the two hooks as handles.

That's it. These lids are easy to clean using a damp paper towel, and the only maintenance they require is being wiped down once every month or so. As long as you're careful not to drop them, they will last as long as your aquarium.

glass lids on my two 10 gallon tanks

If you are interested in other types of DIY aquarium lids, see my post on making lids out of Polycarbonate here.


14

It can be challenging to find reasonably priced aquarium stands. If you want to stack more than one aquarium on a rack, there are even fewer options. This is why most people with a fish room full of many tanks end up building their own DIY aquarium rack. There are a lot of different designs out there. The simplest one I've seen is just stacking cinder blocks on the floor and laying 2x6 boards across them. Personally I like building a cheap rack out of wood.

My First DIY Aquarium Rack

About a year ago I built a DIY wooden rack that holds two 10 gallon tanks. I used 2x4s for the entire structure, and cut some plywood to make shelves for the tanks and the bottom storage area. That whole project cost me about $40. Compare that to the cost of a stand from any store. A stand for a single 10 or 20 gallon aquarium typically runs upwards of $100. This was my first build and although it looked pretty nice (in my opinion) there were a couple things I wanted to change.

My first DIY 10 gallon rack with guppy tank and shrimp tank


The first issue is that in trying to keep the rack from being too tall I squeezed the middle shelf down. As a result I only left about 4 inches of clearance above the bottom tank, not quite enough to get in and do maintenance easily. I also wanted to design it to accommodate more tanks. Having a rack that only holds two 10 gallons isn't the best use of space.

Now that I'm building out my fish room I had an opportunity to replace my original rack with a modified design. This new rack was designed to hold four 10 gallon tanks, and use only a little bit more floor space than my first design. However while I was building I decided I would rather have a 20 gallon on the top shelf than two 10's. But I still have twice the water volume in roughly the same floor area as my first rack.

Building the New DIY Aquarium Rack

In order to support twice the weight of my first stand I used a sturdier design by incorporating upright 2x4s between the load-bearing shelves. You can modify this design to suit any size tank you want; I've seen the same design used for a rack of 40 breeders (which I will probably do at some point). The most important thing is building to the dimensions of the aquarium size you want to support. I recommend having the aquarium in your possession before starting so you can test fit while you build.

The design uses the following cuts of 2x4 studs, all of which can be varying lengths depending on your application:

  • 4 upright supports that determine the overall height of the stand
  • 6 long shelf pieces that the aquariums will rest on (the front and back)
  • 6 short shelf pieces (the sides)
  • 8 vertical support pieces that support the weight of the shelves
  • Optional: 2-6 additional short shelf pieces as cross supports
  • Optional: Plywood sheet for shelving
2x4 Cuts
2x4 Cuts

The lengths of all these pieces will vary depending on your design, but I cut my uprights to 47", the long shelf pieces to 27.5", the shorter shelf pieces to 18", the upper supports to 21.5", and the lower supports to 15". A miter saw is ideal for making the cuts, but I used a circular saw when building my first rack because that's all I had. I use 2.5" #8 wood screws for fastening. A box of these screws is about $10 at a home improvement store and that includes a drill bit. 

I painted all of the wood white before I started assembling the rack. I highly recommend doing it this way if you intend to paint your DIY aquarium rack. For this build I used an old can of white paint that was sitting in my garage for about 5 years, so my cost for painting was $0.

DIY Aquarium Rack - Painted 2x4's
Painted 2x4's

After painting I assembled the three rectangular "shelves". I pre-drilled all my screw holes with a 1/8" bit. It's important to use a flat surface to build on and a level and a square to check your alignment. Once I had those three shelf frames built I slid them onto the long uprights.

DIY Aquarium Rack - Assembling the Stand
Assembling the stand

Before screwing anything into place I checked that each shelf was level. I added the support pieces between the shelves, building up from the floor so that each one sat tightly on the piece below it. It helps to drive in one screw to hold each piece in place, then go back and add another screw at each connection point.

DIY Aquarium Rack - Shelf frame assembled
Shelf frame assembled

You can cut sheets of plywood to create flat shelves (I prefer to do this), but this isn't necessary for standard rimmed glass tanks. The glass bottom of a tank with a plastic rim never contacts the surface the tank is sitting on. In fact, you really only need to support the 4 corners of the frame. If you have an acrylic tank with a flat bottom, then the entire bottom of the aquarium must be supported.

I bought a 4' x 8' sheet of plywood for $20 and cut it to size to make shelves and enclose the bottom section. I sanded and painted the plywood just like I did with all the 2x4 pieces.

My last step was to put some doors on the bottom section of the rack. I used some cheap hinges and knobs to hang the doors, which were cut from the same plywood as the shelves. I'm not a carpenter, so its not furniture quality work, but the entire build cost me under $70.

completed DIY aquarium rack
setting up tanks on new rack

Once all the tanks are set up and running I'll post an update on this rack. You can see my latest fish room updates here.