Skip to content

1

Design

Plumbing the Water Change System

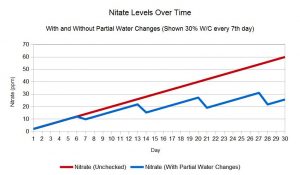
There are a few different ways that fishkeepers with many tanks choose to setup their water change systems. The optimal design for any particular fish room depends on the incoming water source, space available, and volume of water that will need to be regularly changed.

If you are on a well, you probably don't have to worry about paying a water bill or treating your water for chlorine or chloramine. Many people who have well water choose to run a continuous drip system, where new water is constantly being added. Since I have city supplied water that needs to be dechlorinated, I have to treat all water going into my tanks. So a continuous drip was not an option in my case.

Another common design is to use a large reservoir to store treated water. I didn't want to go that route because my space is somewhat limited. I needed a system that could give me filtered, tempered water on demand. And I wanted to be able to control flow to each tank using manual valves, and have drilled overflows to prevent flooding in case I forget I'm filling a tank (this happens a lot).

Fill System

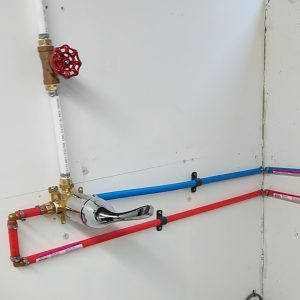
Water coming into my fish room first runs through a dual-stage whole house filter system. The temperature of the water going to the tanks is controlled by a Delta shower valve , and the flow is controlled by a Pentair gate valve. The first section of the system is plumbed with PEX, because it was easy to tap into my existing plumbing.

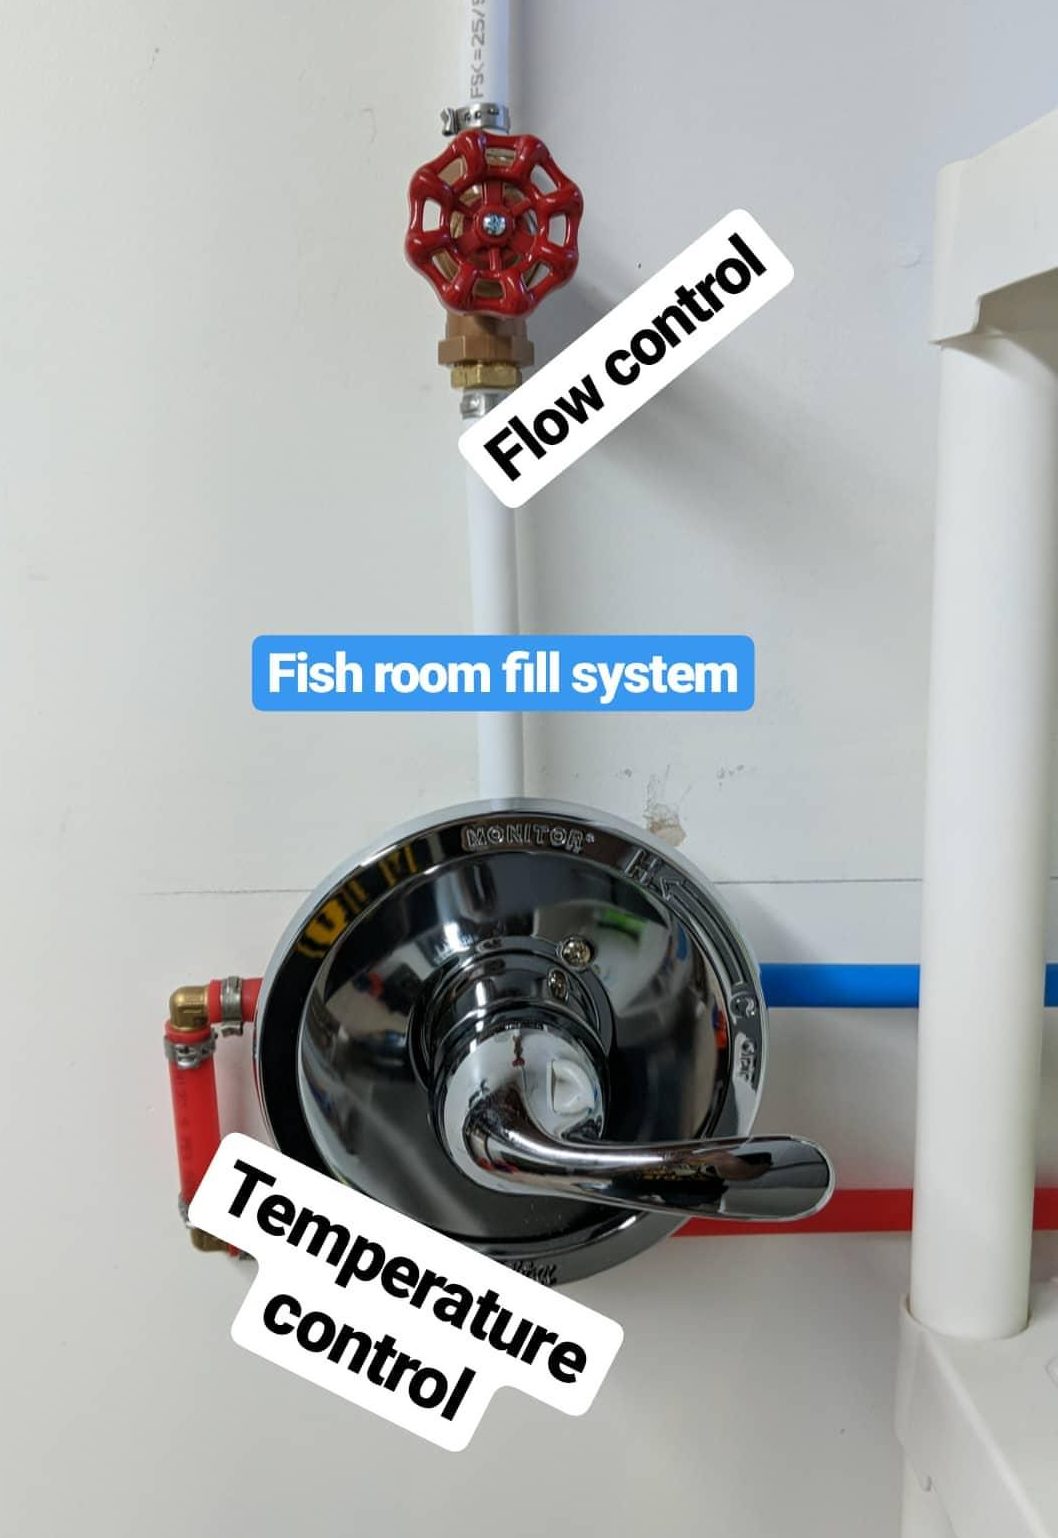
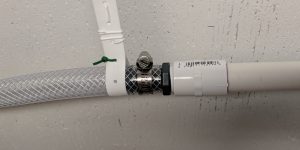
I added a threaded 25 psi pressure regulator made for sprinkler systems to reduce the pressure in the line going to the tanks. This prevents pressure from building up at the individual tank valves and allows me to use irrigation compression tubing in some sections.

25 psi pressure regulator

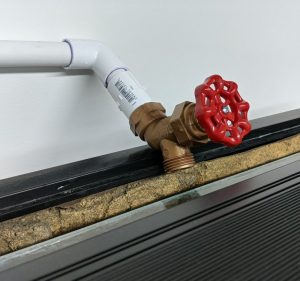
Each tank has its own fill line controlled by a Pentair gate valve with hose threading on the output side. I can screw on any hose attachment, including a Python hose adapter. My smaller tanks have a drip irrigation faucet fitting with irrigation tubing so I can do gradual water changes.

Fill Line Above 29 Gallon

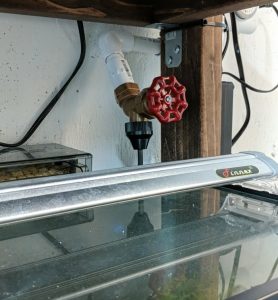
My larger tanks are fed directly from the faucets, with flow controlled using a combination of the valve at the tank and the system's main gate valve.

Hose Valve Above 90 Gal

I can run slow, simultaneous water changes on several tanks at once with this system, or I can change out a lot of water on one tank very quickly. But the best feature is that I never have to fill and carry a bucket of water across the room! To quote the great rainbowfish keeper Gary Lange: "Gary don't carry", and neither do I.

Drain System

When it comes to draining water out of aquariums, there are obviously a few ways to go about it. You can use the old hose and bucket method. Or you can make the upgrade to a Python Clean and Fill System (which I use to perform water changes on my client's tanks). Or you can plumb the tank with a drain, either permanently by drilling a hole for a bulkhead, or temporarily using PVC. I prefer to drill aquariums whenever possible. A drilled overflow will never lose siphon the way an over-the-top PVC built one could. I wrote this post and this other post about drilling tanks if you are planning to try it.

3/4" Overflow Drain
3/4" Overflow Drain

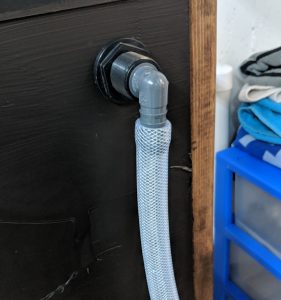
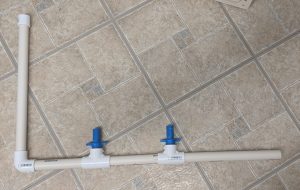
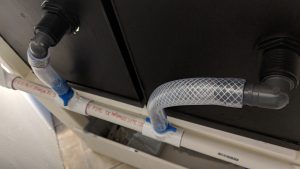
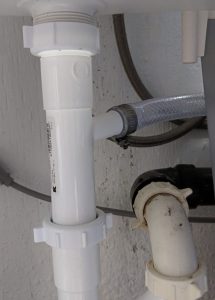
Each drilled tank feeds a flexible braided hose that connects to a 1.5" PVC drain line which runs around the perimeter of the room. Below, you can see the PVC drain manifold underneath my 29 gallon rack.

1.5" Drain Manifold
1.5" Drain Manifold

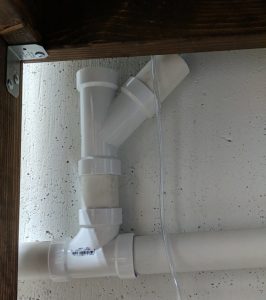
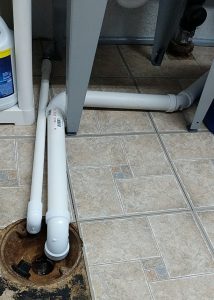
There are a total of 4 sanitary tees spaced out along the drain line, and each can be expanded to handle multiple drains. The pipe starts about 12" off the floor, and runs about 20 feet around the room with a gradual decline to the floor drain.

1.5" Drain Line
1.5" Drain Line

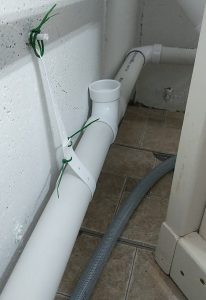
You can see the 90 gallon sump overflow hose alongside the main drain pipe in these two photos .

Floor Drain
Floor Drain

This system took a couple months of planning and tinkering to implement, and I learned a lot about plumbing a fish room in the process. During that time I was constantly looking at examples of other people's systems to help influence my own. Hopefully seeing my design is helpful to someone else in the process of setting up a water change system.


4

The Nitrogen Cycle

The Nitrogen Cycle
The Nitrogen Cycle

You may have heard people talking about “cycling” a fish tank. What they are referring to is establishing the nitrogen cycle. This is a common issue that new fishkeepers run into when setting up an aquarium. Basically, you need to establish a healthy colony of bacteria that will take harmful fish waste (ammonia) and convert it into a much less harmful substance (nitrate). However cycling a tank is only the first step. This post will delve into why regular water changes are critical to maintaining a healthy aquarium.

Ammonia (NH3)

Ammonia is highly toxic to fish and other animals. It is a nitrogen waste product of protein catabolism. It is produced by fish waste, and also by decaying food and organic material in the aquarium. The ideal level for ammonia in an aquarium is 0 ppm (parts part million) or 0 mg/l. Sustained levels of ammonia even in the single digits can cause ammonia toxicity and death in fish.

The exact lethal level for ammonia in an aquarium is actually dependent on the pH of the aquarium. NH3 (ammonia) converts to NH4- (ammonium) and vice versa based on both pH and salinity. This means ammonia does become less toxic at a lower pH. However, this should not be taken to mean that lowering the pH is an appropriate way to deal with elevated ammonia. Changing the pH of an aquarium can have other harmful effects on fish, and is not a sustainable way to deal with ammonia.

Nitrite (NO2-)

Nitrosomonas is a genus of bacteria. This organism oxidizes ammonia into nitrite as a metabolic process. This means the bacteria consumes ammonia and leaves behind nitrite in the aquarium. Unfortunately, nitrite is almost as toxic to fish as ammonia. The ideal level of nitrite in an aquarium is 0 ppm or 0 mg/l. More info on nitrite can be found in this article by Practical Fishkeeping.

It takes about 4 weeks for a sufficient colony of nitrifying bacteria to develop in a new aquarium. This process can be helped along through the addition of a bottled bacteria supplement, such as Seachem Stability. I recommend using Stability to establish healthy bacteria on all new aquariums.

Nitrate (NO3-)

Bacteria called Nitrobacter consume nitrite and convert it into nitrate. This is the final stage of the nitrogen cycle in the aquarium. Once waste has been converted into nitrate, it remains in that form and continues to accumulate in the aquarium. Nitrate is far less toxic than ammonia or nitrite, but it does become toxic to fish when it rises above 100 ppm or 100 mg/l. Ideally, nitrate should be kept below 20 ppm at all times. Sustained exposure to nitrate levels over 20 ppm has been shown to stress fish, making them susceptible to diseases and less likely to breed.

Removing Nitrate Through Water Changes

So how can you prevent nitrate from building up to a toxic level in your aquarium? The answer is regular water changes. When you remove 25% of the volume of water, you also remove 25% of the total nitrate. Replacing the old water with fresh water dilutes the remaining nitrate to a safer level for your fish.

Say for example you have a 20 gallon aquarium with some guppies and snails living in it. You feed the fish daily, adding a few ppm of nitrate every time you add food to the aquarium. Over time, this level rises to 40 ppm nitrate. You perform a 25% water change, removing 5 gallons from the aquarium and replacing it with fresh water. The new level of nitrate in the aquarium is around 30 ppm.

If you do not perform regular water changes and continue to add organic material (fish food) into an aquarium, nitrate will eventually build to a toxic level. The exact frequency and size of water changes varies based on the aquariums stocking, but performing a partial water change of 20-30% weekly is usually ideal. Alternatively, larger, less frequent water changes of around 50% can be performed. However large water changes can cause rapid swings in water chemistry, which can be harmful to fish.

Controlling Nitrate Levels with Weekly 30% Water Changes

Testing Your Aquarium Water

It is important to be able to test for ammonia, nitrite, and nitrate while cycling a new tank and periodically in an established aquarium. For this I recommend a test kit such as the API Freshwater Master Test Kit.  You can also use test strips as a quicker way to get a reading on multiple parameters simultaneously.


I'm installing an automatic water change system on two 10 gallon aquariums. This post will cover how I set up the overflow drain system. See this post about drilling the tanks for more on installing the bulkheads. You can see the overflows installed on the tanks below.

drilled ten gallons on rack

Once the bulkheads and overflows were installed in the aquariums I assembled a drain manifold to mount on the back of the rack. The manifold is built from 3/4" PVC, and connected to the overflows using 3/4" braided PVC tubing. It is mounted to the back of the stand so none of the components are visible from the front.

drain manifold
drain manifold

The manifold has two slip x thread tees that allowed me to thread in hose barb attachments. It also has a vented standpipe at the end to allow air into the system so that water can drain without creating a siphon. The cap on the standpipe has a 3/8" hole drilled into it for air flow. After dry fitting everything, I glued all of the connections except the cap. The threaded connections were made using plumbers tape.

overflow tubing connections

The PVC drain assembly runs into another section of braided PVC tubing, again using a thread x hose barb connection. Plastic pipe hanging straps suspend the line at the right height for each section so that it has a consistent slope. The end point of this line is about 17" inches off the ground, and the bottom of the aquariums is at about 21". The total length of the line is 12 feet. So I have a consistent 1/3" drop per foot, which meets the local plumbing code minimum of 1/4" per foot.

drain hose connection

The drain line then runs across the room and connects to the drain of my utility sink. I used this branch tailpiece to make that connection. This allows the aquarium overflow drain to use the sink's P-trap. The branch tailpiece has a hose barb for 3/4" tubing, I just slid the tubing over it and used a hose clamp to keep it in place.

under sink drain connection

Now I'm in the process of setting up the two tanks attached to this drain system. So far I've run quite a bit of water through the overflows and haven't seen any leaks at all. There shouldn't be any failures because the system is a passive vented drain, so its not under any pressure.

I'll be posting a complete walk through of both 10 gallon setups as soon as they're ready. Currently the plan is for one to be a new home for my cherry shrimp colony, and one to house my male betta. Bothwill be planted tanks running a setup I've never used before, so the results will be interesting.