Skip to content

Blog

4

The Nitrogen Cycle

The Nitrogen Cycle
The Nitrogen Cycle

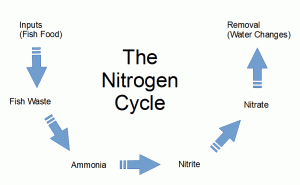
You may have heard people talking about “cycling” a fish tank. What they are referring to is establishing the nitrogen cycle. This is a common issue that new fishkeepers run into when setting up an aquarium. Basically, you need to establish a healthy colony of bacteria that will take harmful fish waste (ammonia) and convert it into a much less harmful substance (nitrate). However cycling a tank is only the first step. This post will delve into why regular water changes are critical to maintaining a healthy aquarium.

Ammonia (NH3)

Ammonia is highly toxic to fish and other animals. It is a nitrogen waste product of protein catabolism. It is produced by fish waste, and also by decaying food and organic material in the aquarium. The ideal level for ammonia in an aquarium is 0 ppm (parts part million) or 0 mg/l. Sustained levels of ammonia even in the single digits can cause ammonia toxicity and death in fish.

The exact lethal level for ammonia in an aquarium is actually dependent on the pH of the aquarium. NH3 (ammonia) converts to NH4- (ammonium) and vice versa based on both pH and salinity. This means ammonia does become less toxic at a lower pH. However, this should not be taken to mean that lowering the pH is an appropriate way to deal with elevated ammonia. Changing the pH of an aquarium can have other harmful effects on fish, and is not a sustainable way to deal with ammonia.

Nitrite (NO2-)

Nitrosomonas is a genus of bacteria. This organism oxidizes ammonia into nitrite as a metabolic process. This means the bacteria consumes ammonia and leaves behind nitrite in the aquarium. Unfortunately, nitrite is almost as toxic to fish as ammonia. The ideal level of nitrite in an aquarium is 0 ppm or 0 mg/l. More info on nitrite can be found in this article by Practical Fishkeeping.

It takes about 4 weeks for a sufficient colony of nitrifying bacteria to develop in a new aquarium. This process can be helped along through the addition of a bottled bacteria supplement, such as Seachem Stability. I recommend using Stability to establish healthy bacteria on all new aquariums.

Nitrate (NO3-)

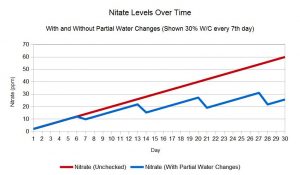
Bacteria called Nitrobacter consume nitrite and convert it into nitrate. This is the final stage of the nitrogen cycle in the aquarium. Once waste has been converted into nitrate, it remains in that form and continues to accumulate in the aquarium. Nitrate is far less toxic than ammonia or nitrite, but it does become toxic to fish when it rises above 100 ppm or 100 mg/l. Ideally, nitrate should be kept below 20 ppm at all times. Sustained exposure to nitrate levels over 20 ppm has been shown to stress fish, making them susceptible to diseases and less likely to breed.

Removing Nitrate Through Water Changes

So how can you prevent nitrate from building up to a toxic level in your aquarium? The answer is regular water changes. When you remove 25% of the volume of water, you also remove 25% of the total nitrate. Replacing the old water with fresh water dilutes the remaining nitrate to a safer level for your fish.

Say for example you have a 20 gallon aquarium with some guppies and snails living in it. You feed the fish daily, adding a few ppm of nitrate every time you add food to the aquarium. Over time, this level rises to 40 ppm nitrate. You perform a 25% water change, removing 5 gallons from the aquarium and replacing it with fresh water. The new level of nitrate in the aquarium is around 30 ppm.

If you do not perform regular water changes and continue to add organic material (fish food) into an aquarium, nitrate will eventually build to a toxic level. The exact frequency and size of water changes varies based on the aquariums stocking, but performing a partial water change of 20-30% weekly is usually ideal. Alternatively, larger, less frequent water changes of around 50% can be performed. However large water changes can cause rapid swings in water chemistry, which can be harmful to fish.

Controlling Nitrate Levels with Weekly 30% Water Changes

Testing Your Aquarium Water

It is important to be able to test for ammonia, nitrite, and nitrate while cycling a new tank and periodically in an established aquarium. For this I recommend a test kit such as the API Freshwater Master Test Kit.  You can also use test strips as a quicker way to get a reading on multiple parameters simultaneously.


6

Completed Filtration Install

**Important note: I am not a licensed plumber and this plumbing configuration may not meet building codes in your area. Please check your local regulations before taking on a project like this**

Why Add a Whole House Water Filter

The city water in my area is somewhat hard and sometimes has a chemical odor out of the tap, so I installed a whole house filter system to bring down sediment levels. This means we no longer need to keep a brita filter in the fridge for our drinking water, and I know the water going into all of my aquariums has had the heavy sediment removed.

This system is installed in front of my house's water heater. Removing sediment before water reaches the hot water tank reduces buildup inside, which can extend the life of the appliance.

The installation was pretty simple and I'll go over everything I used for the project here.

Supplies

This system uses two Pentek big blue 20" filter housings with a dual stage 50 / 5 micron sediment filter cartridge in front of a radial flow carbon cartridge. All of the filter parts used are listed below:

Sharkbite fittings and PEX tubing made the plumbing really simple. The process was the same as my fish room sink plumbing project (I listed the tools out in that post). The only difference is here I am working with the water supply line before my water heater, so it is 3/4" pipe rather than 1/2".

Mounting the Filter Housings

The first step was to secure a piece of plywood to the wall to support the weight of the lag screws that hold up the filter brackets. I used wood screws to attach the wood to the studs behind the drywall. Then I used 1/4" x 1" stainless lag screws and washers to attach the filter brackets to the wood. I tied the two housing tops together with a section of PEX before mounting them so that they would be level with each other on the wall.

Filter housings mounted to wall

With the housings mounted, all I had to do was plumb the system into the cold water line coming into the fish room.

Plumbing

Its important to "dry fit" all of your connections before making the pinch clamp connections, in case you need to make changes. Once a piece of PEX is clamped onto a fitting, its difficult (though not impossible) to remove. A 10 foot stick of PEX tubing is cheaper than a brass fitting, so cutting a new piece while testing out your configuration isn't a big deal.

Making a pinch clamp connection

My system has a bypass line with a ball valve above the filter housings so that I can shut off the flow to the filters. Without a bypass, changing the filters would require shutting off the water to the entire house. There is also a ball valve on either side of the filters so that they can be entirely isolated. Water will still flow to all of the downstream fixtures while I change the cartridges.

Sketch out your fish room plumbing before you start
Sketch out your plumbing before you start

I recommend drawing out your plan on paper before you start making connections. This should include the direction of flow through the system. The handle of a ball valve in the open position should point in the direction of water flow. The picture above shows all 3 valves open, but the bypass valve at the top remains closed while the filters are in use.

After I finished the bypass plumbing, I extended the PEX lines up to the ceiling to join with my cold water supply. I made the connection to the copper pipe using a 3/4" sharkbite fitting on both ends of the system.

3/4" Sharkbite Connection

This project took me a few days because I took my time figuring out where I wanted to tap into my existing pipes, but the actual plumbing could be completed in an afternoon if you have it planned out. Based on my usage the filter cartridges should last somewhere between 3-6 months. So I should only have to touch the system a few times a year.

Finished Plumbing
Finished Plumbing

1

hardscaped 90 gallon

This 90 gallon aquarium has been in the works for a couple months now between other fish room projects. I posted about the sump I built for it last week as well as how I drilled the overflow. I finally have the background, substrate and hardscape in place and I'm getting ready to add fish.

The 3d background in this aquarium is from YourFishStuff. Its a thick silicone material that is coated in crushed rock, so it has a realistic texture and real depth to it. I cut it to fit around my overflow box, and it is held in place by the substrate and a couple of clips at the top of the tank. I'm really impressed with this background and very glad I went for it instead of painting the back of the aquarium black like I usually would. YourFishStuff sells these in a variety of standard tank sizes and the price is very competitive, especially for the quality of the product.

Hardscape in place

The sand substrate is Caribsea Super Naturals Sunset Gold. I got both the substrate and the spider wood on amazon. My first choice is always to support local aquarium stores but none in my area carried this particular sand or large pieces of spider wood.

marked down aquarium plants

I scored some nice big anubias and an El Nino Fern at a 75% discount. I covered how I find cheap aquarium plants in a little more detail in this post. I used super glue gel to attach the anubias to a piece of spider wood. Eventually I plan to have this tank heavily planted, so I'll add more plants over time.

Spider wood with anubias

The rock I used is 40 lbs of landscaping river rock that I got at Home Depot for $12. Its a little more colorful than I had envisioned but once it grows some algae and the tank is densely planted it should look more natural.

river rock
river rock

I'll post further updates on this aquarium when it's fully planted and stocked with fish. If you want to see more of my fish room on a regular basis follow me on Instagram.